Mail Merge at the Insertion Point Add the Last Name Field and Then Review
If you are merging mail lists in Microsoft Part 2016, you will need to insert fields where you want the personalization to be. Offset, position the insertion point appropriately:
-
For messages, click where y'all desire the merge code to appear. You will want the recipient's proper noun and address well-nigh the top of the document, simply below the appointment. You might also desire a greeting like (Dear proper noun). You might desire other personalization too, such as a mention of the person's city or state in a trunk paragraph.
-
For email messages, click where you lot want the beginning bit of personalization to announced. At that place isn't a customary placement for personalized information in e-mail messages like there is for a business letter of the alphabet.
-
For envelopes, place the insertion indicate in the empty text box in the eye of the label.
-
For labels, identify the insertion point in the upper right cell of the tabular array. If you don't run across a tabular array, choose Tabular array Tools Layout →View Gridlines.
-
For a directory, click where you want the merge lawmaking to appear. If you lot want some separator to appear between records, create that (such as a horizontal line or a blank line) and then movement the insertion point above that separator.
After positioning the insertion signal, you are ready to insert the merge code. To simplify the procedure of inserting fields, Word offers two special merge codes y'all can utilise:
-
Accost Block inserts all the fields needed to create a properly formatted address cake, including the spaces and paragraph breaks betwixt them, something like this:
Amy Jones
3855 W. Primary St.
Arcadia, IN 46958 -
Greeting Line inserts a greeting such equally Dear followed past the recipient'southward name. When you insert the greeting line you can choose whether to use their first name, last name, or both. It might expect something like this:
Love Ms. Jones:
You tin likewise insert individual merge fields. For instance, you might mention the person's city in a paragraph like this:
Until June 30, our store in Indianapolis is offering 20% off all clearance items.
Insert an address cake
To insert an address block (for example, on an envelope or label, or at the summit of a alphabetic character), follow these steps:
-
On the Mailings tab, click Address Block.
-
Choose the format in which the person'southward name should announced.
-
If you practise not desire the company proper noun (if whatever) to appear, click the Insert company name cheque box.
-
Specify how addresses exterior of the default country should be shown.
-
Check the preview to brand sure the address block appears as expected.
If the accost preview doesn't look right, click Lucifer Fields and utilise the dialog box that appears to match upward the fields from the merge data file with the fields used for the address block.
-
Click OK to insert the code.
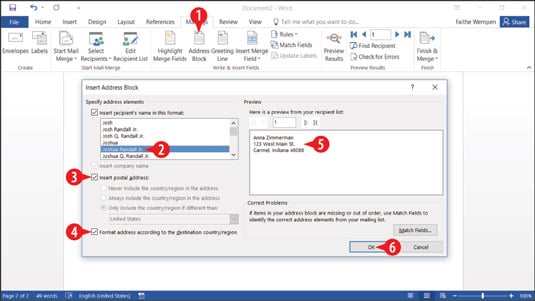
Specify options for the address block.
The address block code appears in the document with double angle brackets effectually it, like this: <
Correct the spacing issue on address blocks
I trouble with the default accost cake is that it leaves as well much vertical infinite between lines, because of the default paragraph spacing. (Each line of the accost block is a carve up paragraph.) To see this for yourself, choose Mailings→Preview Results. Repeat that command to turn off the preview.
To right the trouble, follow these steps:
-
Select the <
> code. -
On the Dwelling house tab, click the Line and Paragraph Spacing button to open its menu.
-
Click Remove Space After Paragraph.
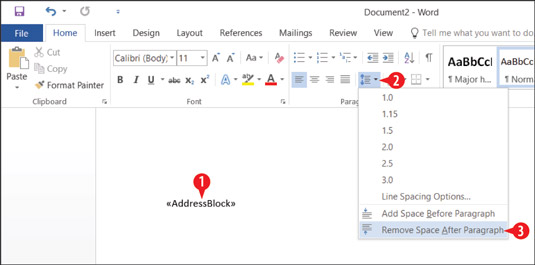
Remove extra space after paragraphs within the address block.
Insert a greeting line
To insert a greeting line, follow these steps:
-
On the Mailings tab, click Greeting Line.
-
Utilise the drop-downwardly lists in the Greeting line format section to specify how the greeting will appear.
-
Specify a greeting line for invalid recipient names (for example, a tape where no recipient proper name was specified).
-
Check the preview area to brand sure the greeting line is as you desire it.
-
You can click the Next button to motion through all the records to check each one.
-
If the fields aren't matching up, click Match Fields and specify which fields from the data list should exist included in the greeting.
-
-
Click OK.
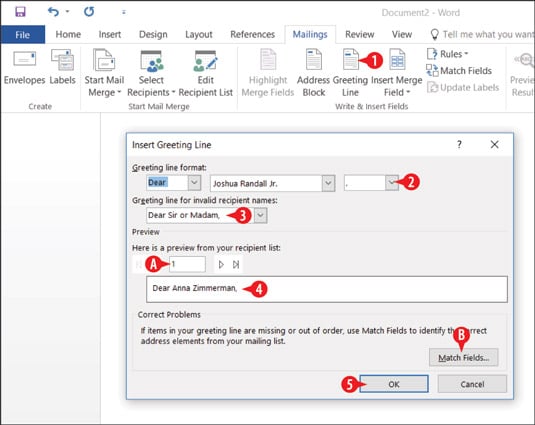
Specify the settings for the greeting line.
Insert an individual merge field
To insert an individual field, follow these steps:
-
On the Mailings tab, click the pointer on the Insert Merge Field button, opening a menu.
-
Click the desired field to insert.
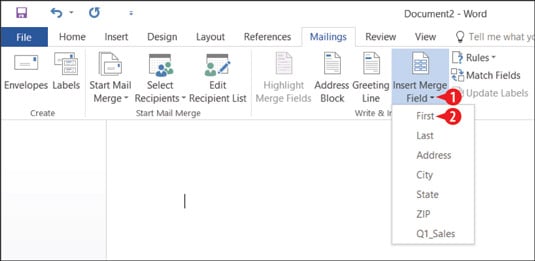
Choose an individual field to insert.
Here'south an alternate method. You lot can click the confront of the Insert Merge Field button (the graphical office, non the text and arrow below it) to open the Insert Merge Field dialog box. From there you can choose a field and click Insert.
Well-nigh This Article
This article tin be institute in the category:
- Full general (Microsoft) ,
Source: https://www.dummies.com/article/technology/software/microsoft-products/general-microsoft/how-to-insert-mail-merge-fields-in-office-2016-139488/